 No carving involved! How wise is that? It’s a 3D owl cake, baked in a bowl. Here is how I do it.

Note: I use modeling chocolate instead of fondant for the decorations on this cake because modeling chocolate is tastier.
Items Needed

- Half sphere cake, roughly crumb coated (crumb coat is optional)
- Bittersweet, white, yellow, and orange, and red modeling chocolate
- Round cutters
- Chocolate & vanilla buttercream (exact recipes can be found in my book)
- Piping bag (I use the 18″ disposable kind)
- Large petal piping tip (such as #124 Wilton)
- Small offset spatula
- Star cookie cutter
1. Begin by rolling out the bittersweet, orange, and white modeling chocolate to 1/8” thickness for the owl eyes.

2. Using round cutters, cut circles of modeling chocolate in the above formation.
3. Roll the yellow modeling chocolate into a 1” diameter ball. Cut it in half to make to make two equal-sized eyeballs.
4. Place the small circles of bittersweet modeling chocolate on the center of the yellow eyeballs. Add tiny balls of white modeling chocolate off to the right then press them down to flatten and adhere them.

5. Stack the circles from biggest to smallest and so that they are offset like crossed eyes. Add the eyeballs to the middle, looking off to the right. Form a simple beak with more yellow modeling chocolate.
6. Put the eyes and beak on the cake and trace them into the surface of the crumb coat using a pointed implement. Remove the eyes and beak and set them aside for later. The traced marks will serve as a guide for the piped design.

7. Mix some of the chocolate and vanilla buttercream together to make a lighter shade of dark brown. Begin by piping around the traced eye orbits.


8. Create rows of feathers by piping from the bottom of the cake up like shingles.
Below is an example of this piping technique in action. In the following video, I’m piping the same kind of layered style to make ruffles on the skirt of a doll cake.
The method involves piping overlapping rows of tight U-shapes, squeezing and releasing the piping hand rhythmically in order to squirt equal amounts of buttercream each time. While piping, I also spin the cake on a turntable using my opposite hand (that’s what’s moving the turntable: my left hand).
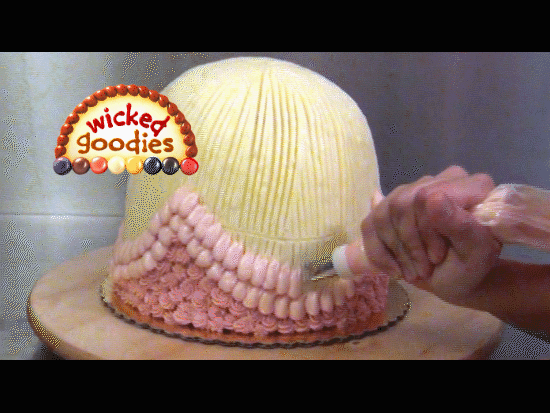
To pipe gradations of color (feathers that are dark on one end and light on another), add two different colors of buttercream side-by-side to the piping bag.

9. To make the ears, cut one 2” wide circle of bittersweet rolled modeling chocolate. Cut it in half and bend each piece at a 45 degree angle. Place the flat side of each ear above the top outside corner of each eye. Pipe up the back of the ears with more buttercream feathers.
 10.To form the wings, pipe chocolate buttercream (using the same petal tip) onto each side of the cake in the shape of half moons. Use a small offset spatula to smooth and shape the wings.
 11. To form the feet, roll out red modeling chocolate and cut two star shapes using star cutters. Push the stars into the bottom of the owl cake where feet would go.
12. Lastly, add the eyes and beak to complete this owl cake design.

Who wrote this owl tutorial for you:

You might also enjoy reading:


